

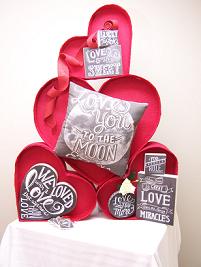
For 2014, Primitives by Kathy (PBK) featured its usual unexpected and charming spin on the traditional Valentine’s motif. The PBK Chalk Art Collection is hand drawn, then reproduced in the company’s popular box sign style for a very realistic chalkboard look.
According to Kathy Phillips, “The chalk art is an updated look to our popular typography that provides a new, more stylized way to share great sentiments as gifts.”
For stylist/designer Anne H. Justmann, her mission was to take these atypical, quirky Valentine’s products and give them a rich, red, instantly recognizable candy box backdrop.
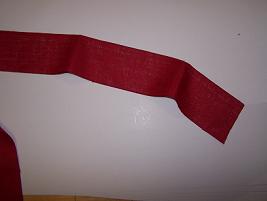
Utilizing Styrofoam insulation and two yards of red burlap, along with ribbons provided by Primitives by Kathy, Justmann made magic! Her holiday display is a versatile Valentine’s vignette: “If you only need a small display for jewelry or other small items, just make one heart. If you are making a small display for lightweight items, you could use thinner foam, which would be less expensive and easier to cut. If you’re working on a budget, stop by a construction site and you can probably find enough foam for your display being discarded.
You can also construct the entire display with a glue gun, instead of spray glue, but it will be more difficult to get the fabric to lay flat. Also, be cautious of the hot glue melting your foam. The great thing about using foam for a display is the ease of cutting and building. It is lightweight and inexpensive! It is also easy to stick pins into it to hang items!”
Primitives by Kathy, 866-295-2849, www.primitivesbykathy.com
Instructions for creating your own heartfelt display are available online as follows:
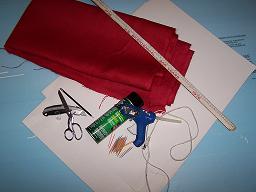
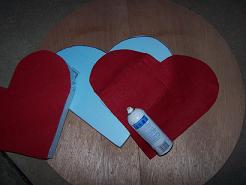
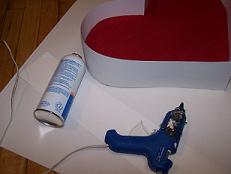
To build this display you need: A 4×8 sheet of three inch Styrofoam insulation (buy at Menards or Lowe’s); you will only use half the sheet. About 2 yards of red burlap (can be bought at Walmart), a can of spray glue (make sure it is a kind that will not melt foam), two sheets of tag board (Make sure you buy quality tag board that is quite stiff.), X-ACTO knife, a yardstick, permanent marker, scissors, glue gun and gluesticks, toothpicks.
Approximate cost $40-$50. (You will have 1/2 a sheet of foam left and spray glue for another time!)
1. Draw the hearts.
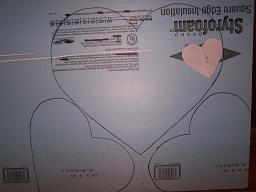
2. Cut out with X-ACTO knife or knife heated with a propane torch. (If you use a torch, it cuts easier and gives you a smoother edge but be sure to do this in a well-ventilated area. The foam gives off noxious fumes.)
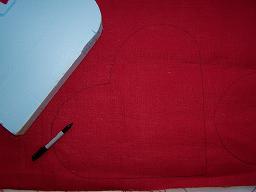
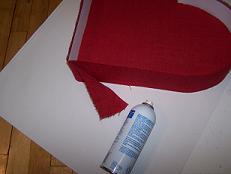
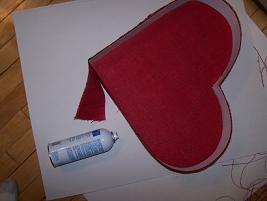
3. Lay the cut out hearts on the burlap and trace around them.
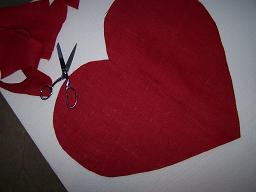
4. Cut burlap hearts with scissors.
5. You are ready to glue the hearts to the foam. Lay out a tarp or cardboard since there will be overspray. Spray one side of the burlap heart and the foam heart. Wait two minutes for spray to become tacky. Apply burlap to heart. Rub from the middle of the heart out to the edge to avoid wrinkles. Do each heart. Set aside to let glue set.
6. Use yardstick and measure out 5 inch strips of tag board. Measure them out lengthwise to make them as long as possible. Do two entire sheets of strips.
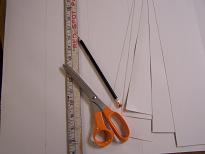
7. Cut tagboard with scissors.
8. You are ready to glue the tag board to the hearts. Spray the side of one heart. Spray only the bottom three inches of the tagboard. Wait two minutes for spray to become tacky. Apply tag board to heart, one side at a time. Start in the point on the top of the heart. Rub well to set glue. Do each heart. Set aside for glue to dry.
9. Measure out 6 inch wide strips of burlap for outside edges of hearts. Measure out 2 1/4 strips for inside edges of hearts. Make them as long as possible on your piece of burlap.
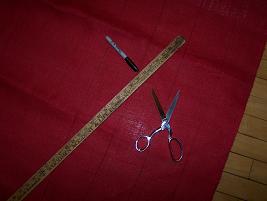
10. Cut out burlap strips. Then pull out three or four strands on ONE SIDE of each burlap strip to make a fringe.
11. Go back to the hearts and use the glue gun to glue together the cracks where the edges of the tag board meet.
12. Apply burlap strips to first the outside edges of hearts and then the inside edges. Use the spray glue as you did before. Be sure to glue down the bottom edge first to avoid cracks.
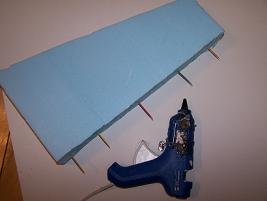
13. You are ready to put your hearts together. You will need to measure the height of your two hearts you want for the bottom of the stack. Go back and cut out two triangles of foam to use for stands on the back of the hearts. (If you can use the finished edge of the foam for the bottom of your triangles it will help to make your display stand flat.) Measure and cut out a stand for the large middle heart. You may also need a couple of support strips for your top heart depending on how large or high your display is. Use toothpicks to help apply the supports. Stick the toothpicks halfway into the foam support. Use the glue gun and apply glue liberally to the entire area and toothpicks. Stick to the back of the heart. Repeat with each heart. Stick in toothpicks to help support while the glue dries hard.
14. Position your bottom hearts and glue them together. Now position the large heart and glue it to the two bottom ones. Place small heart on top and use support braces if needed.
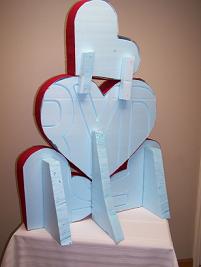
15. You’re done! If needed paint the entire back of the display black. (Don’t use spray paint it will melt the foam.)
If you only need a small display for jewelry or other small items, just make one heart. If you are making just a small display for lightweight items, you could use thinner foam, which would be less expensive and easier to cut. If you’re working on a budget, stop by a construction site and you can probably find enough foam for your display being discarded. You can also construct the entire display with a glue gun instead of spray glue, but it will be more difficult to get the fabric to lay flat. Also, be cautious of the hot glue melting your foam. The great thing about using foam for a display is the ease of cutting and building. It is lightweight and cheap!


