
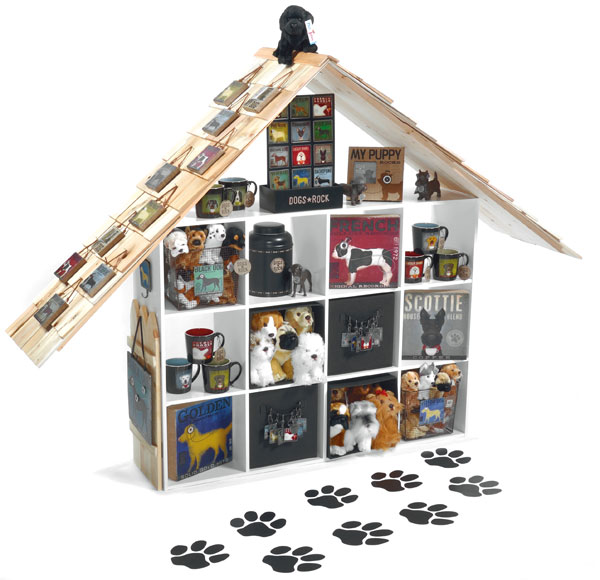
Fido-themed merchandise will be right at home in a doghouse-themed display piece.
Give doggone cute gifts a good home—in a doghouse-themed display piece! Stylist/designer Nancy Borsodi created this fun design using a simple cube-style organizer as a base. Just follow her instructions to make one of your own
1. Find a shelving unit. Most major retailers carry cube-style organizers in various sizes, but you can also use an old bookcase, stacked cubbies or almost any kind of shelving.
2. Make a peaked roof. Arrange two wood boards to make sloped roof shape. Our boards were 48″l x 16″w, but the size you’ll need depends on your shelving unit size. Screw in two angle brackets to join the boards.
3. Attach the roof to the base. Set the joined boards on top of the shelving unit so that they’re flush with the back of the unit. Screw in a mending plate vertically on each side to attach the roof to the base.
4. Staple on shingles. To make the roof look more realistic, add layers of cedar undercourse shingles. For the first layer, start with full-size shingles at the bottom end of one board. Line up different widths of shingles next to each other, leaving several inches hanging off the end of the board, and then staple the shingles in place. Start your next layer 5″ above the bottom of the previous layer. Continue adding layers to both boards, maintaining a 5″ difference between each level, until you reach the peak. Cut off excess shingles with shears. Nail on two thin pieces of wood to create your own roof cap.
5. Add fences to the shelf sides. To cover the sides of the white organizer, build two miniature fences from individual cedar pickets. Wood pickets can be found in the fencing section of most home-improvement stores. They measure 4’t x 4″w x 1″d and are made to repair full-size fences, so you’ll have to cut them down to a size that fits your display. We cut ours to 24″l, leaving the point at the top. Arrange a few pickets side by side, leaving 1/2″ of space between each. Find four 2″ strips of wood that will reach across your pickets. Nail the strips across the pickets about 6″ from the top and 6″ from the bottom of the fence. Attach the fences to both sides of the shelving unit with Velcro.
6. Create a doorway. We added fabric drawers for storage and display in four of our cubes. If you’d like to give your doghouse the look of a doorway, slide in black fabric drawers in the four bottom middle cubes, and use them to store excess merchandise.
7. Fill the display with Fido-motif merchandise. Use nails or decorative tacks to hang items from the roof and fences. Tuck more products into the cubes and under the roofline, making sure that all items can be seen easily.
8. Attract attention with paw prints. As a final touch, print out and laminate paper paw print images. Secure them to the floor with removable adhesive—and lead shoppers straight to your display!
Dogs Rock giftware and Nat & Jules plush dogs: Demdaco, 888-336-3226, www.demdaco.com.

